Decorating Easter eggs is always fun for the kids, but who says moms can’t get in on the fun? Why not make a few longer lasting decorated eggs with these fun and super easy ideas for decorating papier-mache eggs?
I bought these eggs for less than $2 each at the craft store, but you may be able to find something similar at the dollar store or your favorite big-box retailer.
Yarn-Wrapped Egg
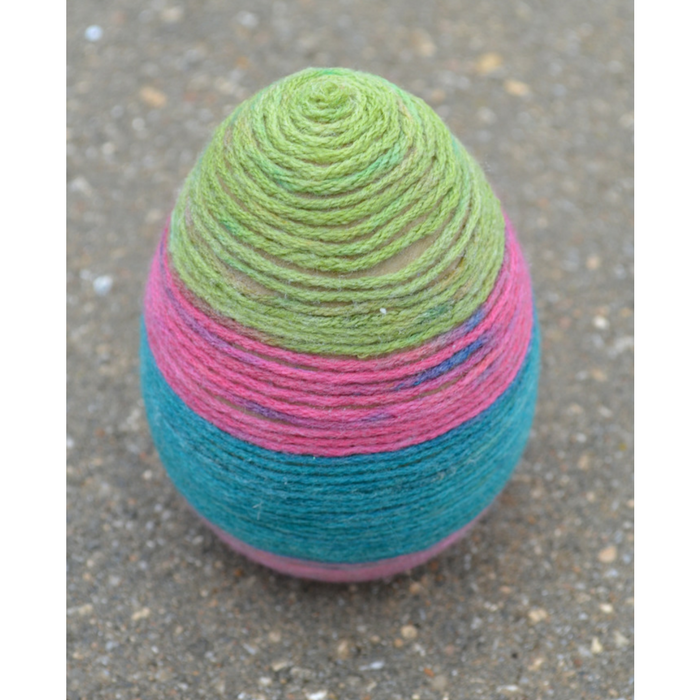
I’m a knitter, so I have a lot of yarn lying around the house, and I’m always looking for ways to use it. I yarn-wrap things a lot. It’s really easy and pretty fun to do, too. I used Mod Podge as my glue, but you can use any white or clear liquid glue you have on hand.
The yarn is used is a lightweight striping yarn, but again, use what you have. I started at the base of my egg, spreading glue on with a foam brush about a quarter inch at a time, and slowly winding the yarn around. The yarn doesn’t have to line up perfectly, and it can be hard to do so, but the more evenly wrapped it ends up the better it will look.
Glitter Egg

I know some people are quite opposed to the use of glitter, and if you’re one of them you might want to look away. For the rest of us, this shimmery style of egg is a lot of fun.
I used Mod Podge here, too (did you know they make a glitter version?) and added glitter on top. It’s easiest (and slightly less messy) if you work on about half the egg at a time and allow it to dry between applications.
I did two “coats” of glitter, then a coat of Mod Podge over top to make the glitter a little more secure.
Other options: mix two or more colors of glitter together, tape off sections and apply glitter in an ombre fashion or in stripes.
Marbled Egg
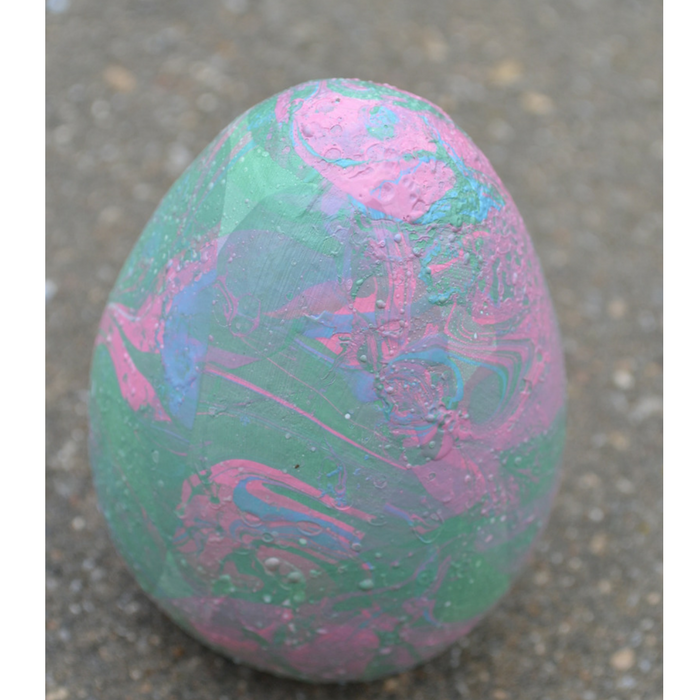
This technique is so much fun you’ll want to marble everything when you’re done. To do it you’ll need your egg, some paint, a small dish, a few colors of fingernail polish (the old stuff that’s separating is fine, just mix it back together before use), a craft stick or stirrer, a paper plate and a paper towel.
First, paint your egg with acrylic (not washable) paint. I went with white.
Fill a dish with water.
Pour the fingernail polish gently and slowly onto the water. You want it to float on the surface as much as possible. Use the craft stick or stirrer to gently stir the polish so it looks more marbled. Gently touch the egg to the surface of the water. It will pick up the polish (and a little bit of water). Lift up, turn the egg slightly and repeat. As you go the surface of the water will become more clear and the impressions left by the polish will be fainter. Put your egg on a paper plate to dry. After a few minutes, the polish will be dry and you can pat off the excess water with a paper towel. If you don’t dab it dry, there will be little bubbles on the surface of your egg. Not the end of the world, but it’s prettier without them. Repeat as many times as necessary to fully cover the egg. It took me four rounds. Definitely worth the effort.
Bonus craft: if you have a lot of time and patience, you can make dragon eggs for Easter. All you need is Styrofoam eggs, flat-topped push-pins, and a bit of paint. They’re really cool, and you can find the tutorial at Our Daily Craft. (http://www.ourdailycraft.com/2015/04/08/diy-dragon-egg-tutorial/)
Sarah E. White is a professional crafter, writer, editor and mom who lives in Fayetteville. She writes about knitting, cross stitch and educational activities for CraftGossip.com and about creativity for moms and other busy people at OurDailyCraft. She loves to make things with and for her 8-year-old daughter.